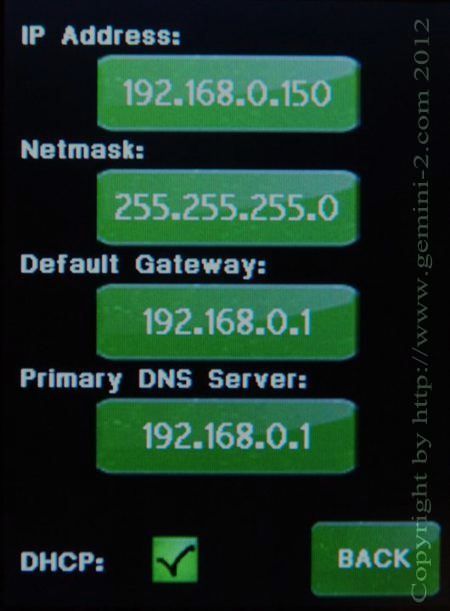
This is most easily done using a cross-over Ethernet cable directly between Gemini’s Ethernet connector and your computer’s network connector. If your computer has a 10/100/1000Mhz port then you can use either a crossover or a standard patch cable. Alternatively, you can use a Gibit Ethernet hub/switch (not a router) and standard cables between Gemini and the hub/switch and between your computer and the hub.
IP Address: In order to successfully communicate with your computer over the network, the Gemini 2 unit must have an IP address on the same subnet as the computer. There are several ways to do this depending on how you connect Gemini to a network. The following sections describe these methods.
If you use a direct Ethernet cable to directly connect your computer to Gemini, you’ll need to assign both the computer’s Ethernet port and Gemini-2 to IP addresses on the same subnet by hand. This assumes that your computer is not running a DHCP server on the network port. By default, if Gemini doesn’t get an IP address assigned by DHCP, it will use its stored value (192.168.0.111) by default). I know of no computer that can assign attached devices a DHCP address unless you have set it up for Internet Connection sharing. So the Static address is usually a must.
- Use a direct cable to connect Gemini 2’s Ethernet port to an Ethernet port on your computer. What type of cable depends on your computers port specifications, see above.
-
Use the appropriate tools on your computer to assign a static
IP address to the computer’s Ethernet port.
Use either my
instructions
for Windows 10, 8.1 or XP or these
(How-To Geek has a web page telling how to assign a static
address in a computer for XP through Win10.)
The address should be in the form 192.168.0.xxx where xxx
is any number between 2 and 254 except 111. Also make sure
no other device is using the same address. No two
Ethernet devices can use the same address on a network. Set the subnet mask to 255.255.255.0.
Set the default gateway to 192.168.0.1
On Windows, you can do this from the control panel. Look for an option to change network connections. Refer to your OS documentation for specific instructions. Now if you have a router such as a Netgear, then that routers default gateway is more than likely going to be 192.168.1.1 If your routers gateway looks like this, then you probably want to use setting to match that. Change your computers hardware port to an address that is the form 192.168.1.xxx where xxx is any number between 2 and 254 except 111. Set the subnet mask to 255.255.255.0. Set the default gateway to 192.168.1.1 Now set the Gemini-2 to 192.168.1.111 using the hand controller. -
You will need to know your computers default gateway.
You can obtain it by running a command prompt (click on cmd
and select run as administrator). See
IPCONFIG Example. At the cursor type: ipconfig
/all
This will show you the default gateways, mac address, and IP addresses of all of your Ethernet ports, if they have been assigned.
- Power on Gemini and attempt to access the web server at http://Gemini or http://192.168.0.111. or as above if your network is not using the same gateway address. If this doesn’t work, use the hand controller menu to ensure that Gemini’s IP address is http://192.168.0.111 by selecting the menu->mount->network options. If it is not set to that address, then you can either change your computer’s IP address to match Gemini’s IP address or you can change Gemini’s IP address to match your computers. Please note: Some browsers try to connect using a secure connection, https:// This will not work with the Gemini-2. It has to start with http://
- Gemini uses NetBIOS name resolution so that you don’t need to type the IP address into your browser. If you haven’t already done so, enter http://gemini in your browser to access the web server. The username is “admin” and the default password is blank. Here us an example of the login screen (with the user name already added):
- If the steps in step 4 above do not work, you may need to enable NetBios over TCIP. The sets are listed at the bottom of this page.

Fig 1
